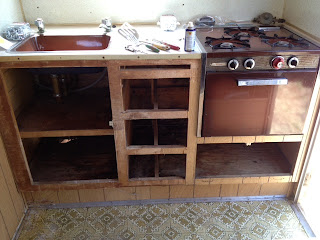
When I initially made today's appointment with Denny to check and repair the electrical, propane, and water systems in Lil' Chick, it was before I started ripping out parts of the flooring and uncovering the "floorlights" - you know, like skylights, but in the floor.....
When he saw the Chick this morning, he suggested that we switch gears a bit: rather than getting the systems up and running today, our first priority should be to stabilize the rot and get the holes covered. He's going to find a slot in his schedule and get Lil' Chick in sometime over the next few weeks and patch those floorlights.
He said that the areas of rot and damage in the two rear corners should be an easy fix, as will the galley cabinet. I was thinking it would have to be completely taken out and rebuilt, but Denny said he can reface it and rebuild the drawers and we'll be good to go!
One thing ya gotta remember: my intention never was to to authentically restore the Thunderbolt to her original 1964 grandeur. I just want to fix the things I can, have the worst things repaired, glamp her up, and take her camping, alternating camping trips with my 2012 Rockwood A-frame. Nothing more complicated than that!
Between now and when I next take her back to Denny's, my homework assignment from him is to finish prying off the damaged facing from the lower galley cabinet. I can do that!!!
Friday, May 31, 2013
Thursday, May 30, 2013
Floor Demo-ing
Taking Lil' Chick for the first time tomorrow to see Denny at Southern California Vintage Trailer Design, so he can get me some trailer lights working and give me some idea of what we're up against!
Before that, however, I wanted to get as much demo-ed as possible, especially the floor under the galley cabinets, seats, and in the closet. I had already done the area under the galley, so today it was on to the remainder. Everything, that is, except for the flooring in the "Great Room" - i.e., the teeny tiny actual living space. Because I had already found rot and holes under the galley cabinets and was anticipating lots more in other areas of the trailer, I wanted to leave the main flooring area intact - because that might be the only thing holding the Chick together after I'm done demo-ing!
I started underneath the curb-side bench seat. Because of all the great hinged panels to access the areas under the seats, this was pretty easy.
The first thing that had to go was the ancient bag of sand that someone stowed in the back. Not sure if it was put there for ballast, or for use for traction in snow or ice, but it was broken and leaking and had to be emptied cup by cup until I could lift the bag out.

Next up was the center rear bench.
No sand bags in this one, but I did uncover something interesting. Previously, I had thought that the groovy orange, brown, and avocado linuleum was original to the trailer, but peeling it up under this seat revealed the true original floor covering, a sweet, clean white with a marble-y pattern and small patches of gold fleck.

I can just imagine Lil' Chick fresh out of the factory, proudly sporting her gleaming white floor!
On to the street-side bench seat, with its wheel well sheathed in bright green carpet.
OK, back to work. I moved on to the closet, where I spent the majority of today's demo session.
"Closet" in the Chick is actually the space encompassing the closet area, along with the spaces under the icebox and the water tank on the upper front wall.
The first time I looked in the Chick's closet, I noticed a toilet paper holder hanging on the wall. I assumed the former owners perhaps had a porta-potty that they kept in the closet - and the space actually looked like a perfect spot for mine. But when I swept away some of the debris on the floor and began removing the linoleum, I found this:
Looks kinda like it could be a sewer drain covered with a linoleum patch, right? I wasn't brave enough to open it up, and the closet space doesn't look big enough for an actual RV-type toilet, so I'm not sure what this is. Hopefully Denny will be able to provide some insight.
I removed one last piece of paper that had been attached to the closet wall along with the wiring diagram and warranty that I removed a couple days ago; it was installation instructions for a "6 Pole Trunk-Trailer Kit." I have absolutely NO idea what that is, but I do know that they bought it at Pep-Boys for $5.98


Into a protective sleeve in the Lil' Chick binder it goes.
Next I removed the Allied Moving Company cardboard box that was taped around the back of the icebox. I assume they did this for extra insulation? Regardless, it was a mother to remove.
I'm not sure yet if I'm going to keep the icebox or swap it out for a real fridge. The Trav'ler icebox is a way-cool bit of retro camping history, but I've been spoiled with the little fridge in my A-frame: my wine stays nicely chilled!


Finally done for the day. Lil' Chick looks all ready for her inspection tomorrow!


A good day of demo is defined by the debris pile when finished - I think today was a good day!

Before that, however, I wanted to get as much demo-ed as possible, especially the floor under the galley cabinets, seats, and in the closet. I had already done the area under the galley, so today it was on to the remainder. Everything, that is, except for the flooring in the "Great Room" - i.e., the teeny tiny actual living space. Because I had already found rot and holes under the galley cabinets and was anticipating lots more in other areas of the trailer, I wanted to leave the main flooring area intact - because that might be the only thing holding the Chick together after I'm done demo-ing!
I started underneath the curb-side bench seat. Because of all the great hinged panels to access the areas under the seats, this was pretty easy.
 |
| Curb-side bench seat. |
 |
| Built-in sand bag. I wonder if this was an option on this model..... |
 |
| Cup by cup until it was all gone. |

 |
| After the mod 60s linoleum was peeled away, the patched carpet was next to go. |
 |
| It's pretty easy to sweep away the sand when there's a 2-inch gap between the floor and what's left of the wall! |
 |
| Rear center bench seat before..... |
 |
| .....and after. |

I can just imagine Lil' Chick fresh out of the factory, proudly sporting her gleaming white floor!
On to the street-side bench seat, with its wheel well sheathed in bright green carpet.
 |
| Street-side bench seat before..... |
 |
| .....and after. And now sporting a nice view to the driveway below. |
 |
| Of course I had to go outside and crawl underneath so I could get a mouse-eye view into the Chick from below! |
 |
| Again with the bright green carpet? |
 |
| Looking forward towards the front wall; that's the copper drain pipe going from the sink to the outlet through the street-side outer wall (from right to left). |
 |
| Green carpet and mod linoleum peeled away; layers of cardboard and foam are next to go..... |
 |
| .....revealing lots of rot and another view through to the driveway. |
 |
I removed one last piece of paper that had been attached to the closet wall along with the wiring diagram and warranty that I removed a couple days ago; it was installation instructions for a "6 Pole Trunk-Trailer Kit." I have absolutely NO idea what that is, but I do know that they bought it at Pep-Boys for $5.98


Into a protective sleeve in the Lil' Chick binder it goes.
Next I removed the Allied Moving Company cardboard box that was taped around the back of the icebox. I assume they did this for extra insulation? Regardless, it was a mother to remove.
 |
| Back of icebox before..... |
 |
| .....and after, showing old foam insulation. |

 |
| The Trav'ler is pretty deep - I think it's bigger than the fridge in Stella the A-frame. |

Finally done for the day. Lil' Chick looks all ready for her inspection tomorrow!


A good day of demo is defined by the debris pile when finished - I think today was a good day!

Tuesday, May 28, 2013
Think the Warrenty is Still Good?
When I first looked inside Lil' Chick's closet, even before buying her, I saw a couple pieces of paper taped to the inside wall. When I say "paper" and "taped," I really mean something more like "remnants of parchment" and "barely holding on with ancient masking tape."
Turned out to be a wiring diagram.....

.....and what I think is the original warranty.

They're in such bad condition - very dry and brittle and pieces missing - that I wanted to somehow save them, so tonight I carefully removed them from the wall, attached them to sheets of plain acid-free paper, put them into clear protective sleeves, and tucked them into my Lil' Chick binder.
They've already yielded some valuable information about the Chick: from the decal above her rear window, we know she's a "Thunderbolt," and now from these papers we know that she was manufactured by Montclair Mobile Homes, Inc., Travel Trailer Division (no longer in existence). Because there were a plethora of travel trailer manufacturers in Southern California during the mid-century, I'm assuming the "Montclair" is the SoCal town, versus the town of the same name in Northern California, so I contacted a historical society in that area to see if they have any info on them as a company in the 1960s. I'd love to find some archival info about Thunderbolts - my web searching so far has yielded a big fat nothing.
But, that's all part of the sleuthing adventure in Vintageville!

Turned out to be a wiring diagram.....

.....and what I think is the original warranty.

They've already yielded some valuable information about the Chick: from the decal above her rear window, we know she's a "Thunderbolt," and now from these papers we know that she was manufactured by Montclair Mobile Homes, Inc., Travel Trailer Division (no longer in existence). Because there were a plethora of travel trailer manufacturers in Southern California during the mid-century, I'm assuming the "Montclair" is the SoCal town, versus the town of the same name in Northern California, so I contacted a historical society in that area to see if they have any info on them as a company in the 1960s. I'd love to find some archival info about Thunderbolts - my web searching so far has yielded a big fat nothing.
But, that's all part of the sleuthing adventure in Vintageville!
Monday, May 27, 2013
Just a Little Work Today.....
Spent the weekend on a little mini-vacation, but just HAD to get back into Lil' Chick to do a little work when I got home this afternoon.
Off came the four upper cabinet doors and their magnetic catches.
Off came the four upper cabinet doors and their magnetic catches.
 |
| Rear upper cabinet doors off..... |
 |
| .....as well as the front upper cabinet doors above the galley. |
 |
| Accumulating quite a collection of dis-assembled interior parts. |
Also took a good look at the brake and running lights. Since they're all faded and cracked and will have to be replaced, I wanted to document the sizes and brands so I can start searching the web for them. Since I'm not doing a full-on authentic restoration, I just want to find similar lights - they don't have to be 1964 or vintage.
 |
| Brake lights, 7" diameter. |
 |
| Brake light detail: Autolamp 575 Chicago SAE-S-A-AI-T-61 |
 |
| Front side yellow running lights, 5" long. |
 |
| Front side yellow running light detail: Autolamp 662 SAE 60 |
 |
| Rear side red running lights, 5" long. |
 |
| Rear side red running light detail: Pathfinder 662 SAE-P-69 |
I have absolutely NO idea what any of these numbers mean, but you can be sure that I'll find out. It's all about research and education - that's part of the adventure!
Saturday, May 25, 2013
More Demo-ing
Spent a couple hours this afternoon in Lil' Chick, working on the galley's lower cabinets. I want to get as much damaged stuff out of the trailer as possible before I take it up to Denny at Southern California Vintage Trailer Design for the electrical, propane, and water systems work. While she's there, Denny will take a good look at her and we can start developing a plan of attack. While I want to do a lot of the Chick's makeover myself, I fully realize my limitations! I can do demo-ing and the "lipstick" stuff (paint, flooring, etc.), but when it comes to structural shit, I gotta leave that to the experts. By stripping out the old linoleum at the bottom of the cabinets, the wood of the floor is exposed and will enable Denny to get a better look at its condition.
Today's work revealed some rot and a hole in the floor in the lower cabinet under the sink. It's never a good sign when you can see daylight after you peel away layers of linoleum!
Comparatively, the upper shelf directly under the sink is in pretty good shape:
The cabinet under the stove shows some rot too, but no daylight (yet):
I figure that the entire galley cabinet unit will have to be rebuilt, but as much as I wanted to remove the stove and sink and just yank the whole thing out today, I left it in place so Denny will be able to see an accurate footprint.
Took the two cabinet doors off, cleaned up two buckets full of debris, temporarily plugged the hole in he cabinet, and I'm calling it a day!
Today's work revealed some rot and a hole in the floor in the lower cabinet under the sink. It's never a good sign when you can see daylight after you peel away layers of linoleum!
 |
| Lower shelf under the sink before today's demo-ing..... |
 |
| .....and after. Well hello, daylight! |
Comparatively, the upper shelf directly under the sink is in pretty good shape:
 |
| Not too bad. |
 |
Took the two cabinet doors off, cleaned up two buckets full of debris, temporarily plugged the hole in he cabinet, and I'm calling it a day!

Friday, May 24, 2013
Love Me Some Demo-ing!
OK, I guess it's probably not technically "demo-ing," but I did go into Lil' Chick for the first time today to start dismantling and removing the stuff that needed to go: the curtains and hardware, the plethora of little knick-knack shelves that were on the walls, and the jerry-rigged electrical (which consisted of a couple extension cords plugged into one of the lights and running through cabinets).
The shelves were interesting: a total of six, all homemade and varying sizes, edged with heavy-duty red cable to prevent things from falling off, and mounted with big-ass brackets. Not sure who made them or when, but there was definite evidence of a feminine touch: they were covered with pretty white and gold contact paper that was carefully scalloped along the edges.
I took out the seat cushions and stored them for later; eventually I'll take them to Upholstery Factory Outlet (UFO) in National City and have them remade with new foam and fabric.
With all the cushions out, I could get a comprehensive look at the water and mold damage in the corners. And actually, compared to some of the trailers I'd seen, it isn't that bad.
Getting all of the cushions out also allowed me to see all the storage there is under the seats.
Next I moved to the galley area. Now THIS is gonna take a lot of work. The lower cabinets and drawers had been damaged by a chemical spill of some kind (no, Lil' Chick wasn't a meth lab - or at least I hope she wasn't!). I think all of the galley wood is too far gone and will have to be rebuilt.

While inside the cabinets, I began peeling up the top layer of avocado green linoleum; who knows when when that was put in, but from the color it was probably sometime in the 70s. LOTS of damage under the linoleum on the bottom shelf of the lower galley cabinet.....


.....but removing it revealed what I think is the original 1964 linoleum, in all its orange and brown and avocado groovy glory!

While working on the galley, I was finally able to dislodge the top drawer and remove it. It had been stuck closed because of the damaged cabinet wood. Look at the great surprises I found inside!
I also found some really retro automotive equipment when cleaning out Lil' Chick's closet: a pair of trailer mirrors!

These would have been put on the front of the car, securing at the side edges of the hood and clipping under the wheel wells. Cool!
Had quite a good-sized pile of stuff for the trash when I was done, including an electric frying pan, an unopened 4-pack of Marina toilet paper, a plastic shower curtain, and a yummy jar of well-aged peanut butter. Blech. (Sorry, I think I just threw up a little in my mouth)

I also had the pile of "keepers," including a homemade shelf for the closet and the cool folding dinette table with the telescoping legs and gold-flecked Formica top that matches the galley's counters.
Next task: find a place to store all this stuff!

 |
| Gotta give them credit for ingenuity! |
The shelves were interesting: a total of six, all homemade and varying sizes, edged with heavy-duty red cable to prevent things from falling off, and mounted with big-ass brackets. Not sure who made them or when, but there was definite evidence of a feminine touch: they were covered with pretty white and gold contact paper that was carefully scalloped along the edges.
 |
| Someone spent a lot of time prettying up these shelves. |
 |
| Not in the best shape now, but cute and functional at one time. |
 |
| So 60s! |
With all the cushions out, I could get a comprehensive look at the water and mold damage in the corners. And actually, compared to some of the trailers I'd seen, it isn't that bad.
 |
| Street side, rear corner, where walls and seat meet. |
 |
| Curb side, rear corner. |
Getting all of the cushions out also allowed me to see all the storage there is under the seats.
 |
| Can never have too much storage! |
 |
| The seat under the rear window opens too. |
Next I moved to the galley area. Now THIS is gonna take a lot of work. The lower cabinets and drawers had been damaged by a chemical spill of some kind (no, Lil' Chick wasn't a meth lab - or at least I hope she wasn't!). I think all of the galley wood is too far gone and will have to be rebuilt.
 |
| Damaged wood on lower galley cabinets. |

While inside the cabinets, I began peeling up the top layer of avocado green linoleum; who knows when when that was put in, but from the color it was probably sometime in the 70s. LOTS of damage under the linoleum on the bottom shelf of the lower galley cabinet.....


.....but removing it revealed what I think is the original 1964 linoleum, in all its orange and brown and avocado groovy glory!

While working on the galley, I was finally able to dislodge the top drawer and remove it. It had been stuck closed because of the damaged cabinet wood. Look at the great surprises I found inside!
 |
| My favorite things: vintage and shabby!!! |
I also found some really retro automotive equipment when cleaning out Lil' Chick's closet: a pair of trailer mirrors!

These would have been put on the front of the car, securing at the side edges of the hood and clipping under the wheel wells. Cool!
Had quite a good-sized pile of stuff for the trash when I was done, including an electric frying pan, an unopened 4-pack of Marina toilet paper, a plastic shower curtain, and a yummy jar of well-aged peanut butter. Blech. (Sorry, I think I just threw up a little in my mouth)

I also had the pile of "keepers," including a homemade shelf for the closet and the cool folding dinette table with the telescoping legs and gold-flecked Formica top that matches the galley's counters.
Next task: find a place to store all this stuff!

Subscribe to:
Posts (Atom)